
A pressure test introduces compressed air into your cooling system to identify leaks with precision. When performed correctly, this test can definitively show whether your head gasket has failed and even indicate where the leak is occurring. The pressure tester is an affordable, professional-grade tool that provides actionable results.
How Pressure Testing Works
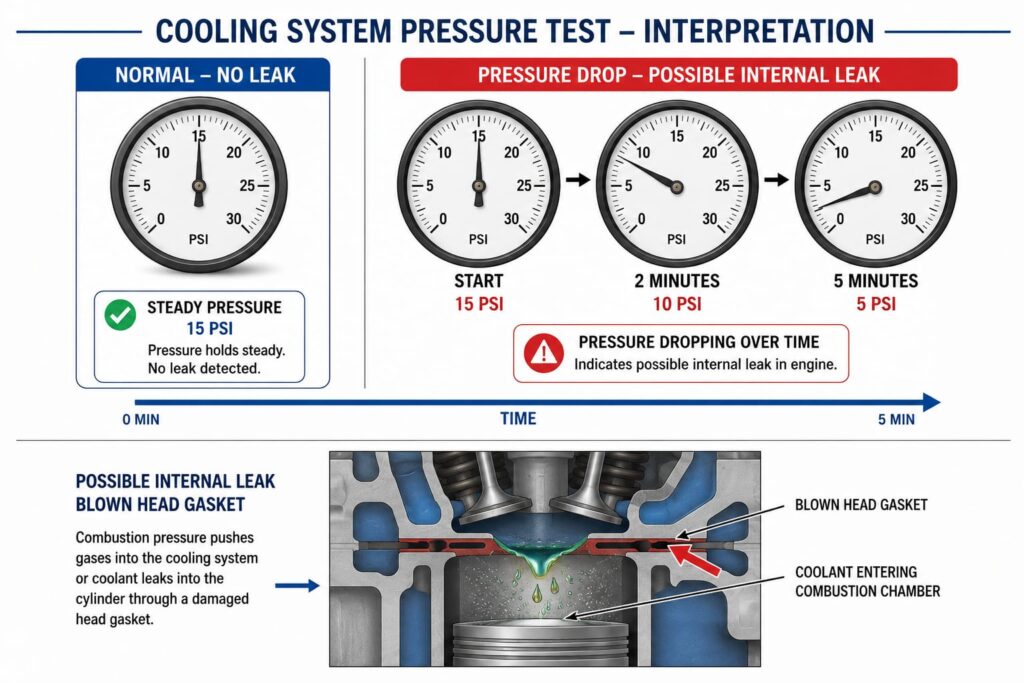
The cooling system operates under pressure—typically 15-20 PSI. A pressure tester increases this pressure incrementally and monitors for pressure loss. If your head gasket is blown, pressurized coolant will escape through the damaged seal. A slow pressure drop indicates a small leak; rapid loss indicates a severe failure.
Equipment Needed
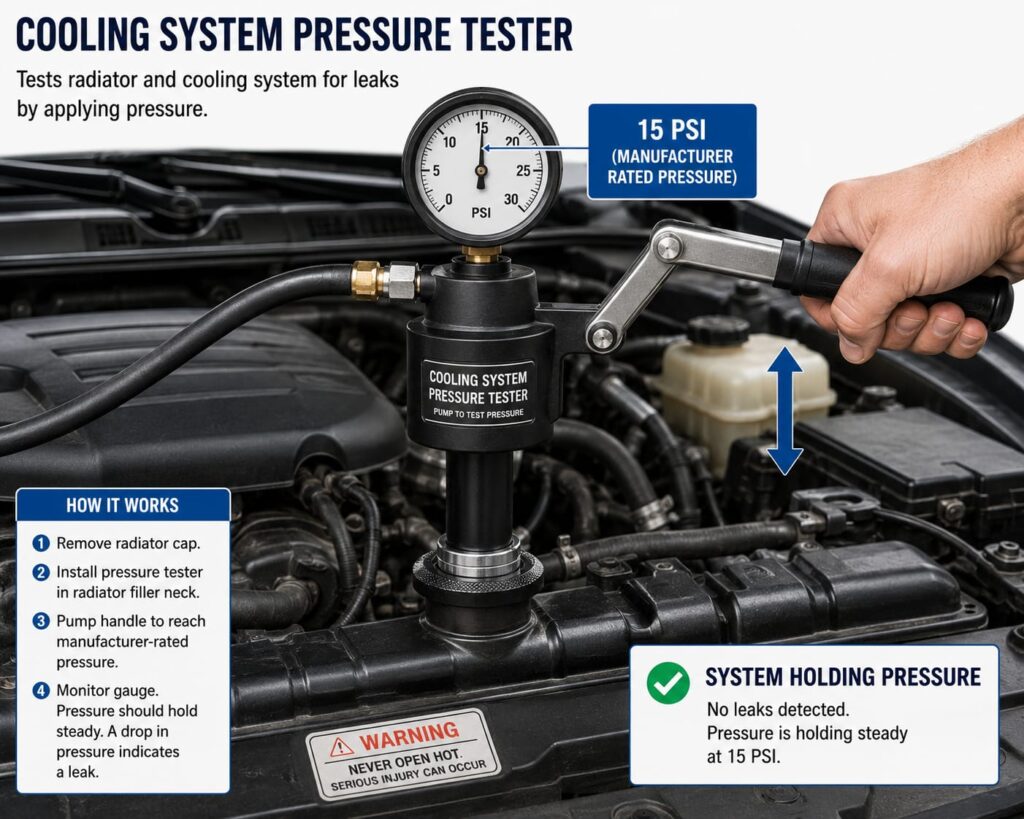
• Cooling System Pressure Tester Kit ($30-80)
• Correct Adapter for Your Vehicle (usually included)
• Catch Pan or Rags (to catch any coolant spillage)
• Safety Glasses (for eye protection)
• Work Gloves (for grip and protection)
• Pump Bulb or Compressor (depending on tester type)
Step-by-Step Procedure
Step 1: Cool Down Completely
Allow your engine to cool for at least 1-2 hours. Pressurizing a hot cooling system is dangerous—pressure can spike suddenly, causing burns or hose rupture.
Step 2: Select the Correct Adapter
Your pressure tester kit includes multiple adapters for different vehicles. Consult your owner’s manual to identify your radiator cap type (usually 16, 18, or 20 PSI cap). Select the matching adapter.
Step 3: Remove the Radiator Cap
With the engine cool, carefully remove the radiator cap. Place it safely aside. Note the current coolant level.
Step 4: Install the Pressure Adapter
Screw the adapter into the radiator filler neck where the cap was. Ensure a tight seal.
Step 5: Build Pressure Incrementally
Using the pump bulb, slowly pressurize the system. Add pressure in 2-3 PSI increments, pausing after each to observe. Your tester should have a gauge showing current pressure.
Step 6: Observe and Document
Watch for signs of leakage: coolant seeping from hoses, water pump, radiator connections, or—most tellingly—bubbles in the coolant (indicating combustion gas escaping from the crankcase). Note the maximum pressure reached and any pressure drop rate.
Interpreting Pressure Test Results
Holds Steady Pressure: Normal. No significant leak.
Slow Pressure Drop (2-5 PSI per minute): Minor leak, possibly hose or clamp.
Fast Pressure Loss (5+ PSI per minute): Significant leak. If no external leak is visible, head gasket failure is likely.
Bubbles in Coolant: Definitive sign of internal leak. Combustion gases are entering the cooling system.
Coolant from Oil Filler Cap: Pressure is forcing coolant into the crankcase. Head gasket failure confirmed.
Advantages of Pressure Testing
✅ Precise Diagnosis: Pinpoints leak location
✅ Affordable Equipment: $30-80 for a basic kit
✅ Reusable Tool: Can be used for future diagnostics
✅ Visual Confirmation: You see the leak happening
✅ Differentiates Issues: Distinguishes head gasket from radiator or hose leaks
Limitations of This Test
❌ Requires Equipment: Must buy or borrow a pressure tester
❌ Manual Process: Requires careful attention and patience
❌ Safety Risk: Pressurized coolant can be hot and burn you
❌ Doesn’t Show Severity: Indicates leak presence, not engine damage extent
Cost and Time Estimate
Pressure Tester Purchase: $30-80 (one-time cost; reusable)
Pressure Tester Rental: $10-20 per day from auto parts stores
Time Required: 15-20 minutes (plus cool-down time)
Safety Precautions
• Always work on a cool engine (wait 1-2 hours after driving)
• Wear safety glasses and gloves
• Apply pressure slowly and incrementally
• Never exceed the radiator cap’s rated PSI
• Release pressure slowly—never jerk the adapter off
FAQ
Q: What PSI should I pressurize to?
A: Check your radiator cap’s rated pressure (usually 15-20 PSI). Never exceed this specification.
Q: Can I rent a pressure tester?
A: Yes. Most auto parts stores (AutoZone, Advance Auto Parts) rent pressure testers for $10-20 per day.
Conclusion
The coolant pressure test is a professional-grade diagnostic that delivers definitive results. Whether you purchase a tester ($30-80) or rent one ($10-20), this test is invaluable for confirming head gasket failure before committing to expensive repairs. Combined with oil inspection and exhaust smoke observation, pressure testing completes a comprehensive diagnostic picture.
Ready for the most advanced tests? Check the [PILLAR LINK: How to Test a Blown Head Gasket – Complete Guide] for leak-down and compression tests.