
Installing a cylinder head correctly is one of the more unforgiving jobs in engine repair — get the sequence, torque, or cleanliness wrong, and you can cause a repeat gasket failure almost immediately. Whether you’re doing this yourself or simply want to understand what your mechanic should be doing, here’s the proper step-by-step process.
This post is part of our complete guide on using head gasket sealer and understanding proper installation — see the full breakdown below.
“complete head gasket installation guide”]
Before You Start: What You’ll Need
- A torque wrench capable of your engine’s specified head bolt torque
- The exact torque specification and tightening sequence for your specific engine (found in a factory service manual)
- A new head gasket rated for your engine, plus new head bolts if your manufacturer specifies torque-to-yield bolts (these often can’t be reused)
- Gasket scraper or cleaning solvent for surface prep
- A straightedge and feeler gauge to confirm the head and block surfaces are flat
Step 1: Prepare and Inspect the Mating Surfaces
Before anything else, both the cylinder head and the engine block’s mating surface need to be completely clean of old gasket material, oil, and debris. Use a proper gasket scraper rather than anything abrasive that could gouge the soft aluminum surface. While you’re at it, check both surfaces with a straightedge and feeler gauge to confirm they’re flat — this is the point where warping should have already been caught and corrected.
[LINK: Cylinder Head Resurfacing Machine]
Step 2: Position the New Gasket Correctly
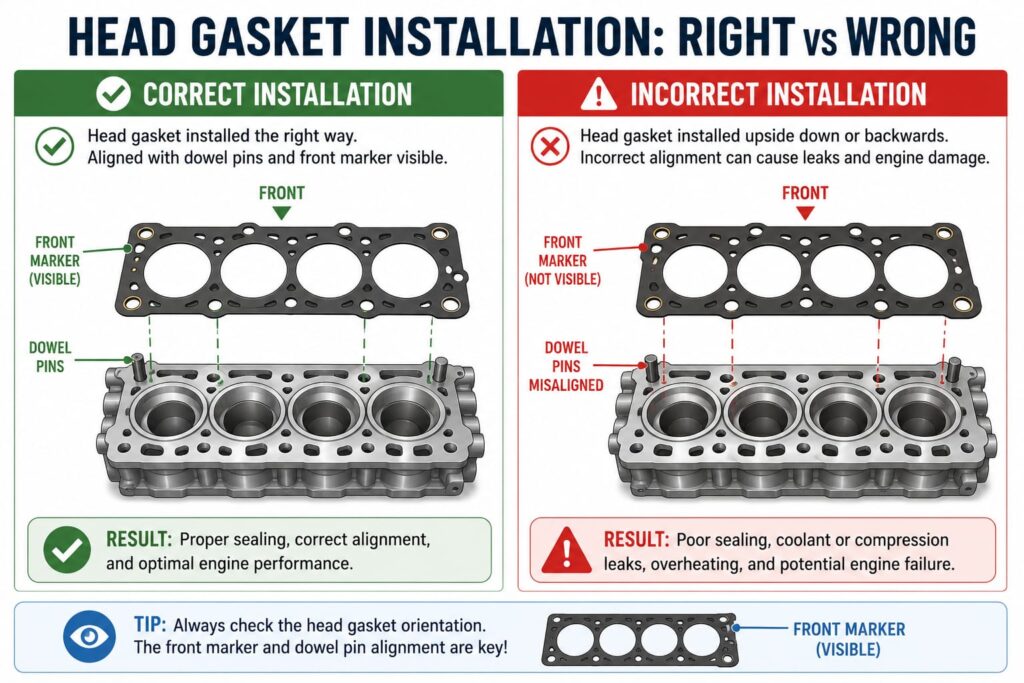
Most head gaskets are directional and will have markings indicating which side faces up or which end faces the front of the engine. Installing it backwards or upside down can block coolant or oil passages entirely, causing immediate and serious engine damage. Double-check the gasket’s orientation against the manufacturer’s instructions before setting it down — this is one of the most consequential mistakes in the entire process.
Step 3: Set the Cylinder Head in Place
With the gasket correctly positioned, lower the cylinder head straight down onto the dowels or guide pins without sliding it into place, which could shift or damage the gasket. Take care that no wires, hoses, or tools are trapped underneath as it seats.
Step 4: Torque the Head Bolts in the Correct Sequence
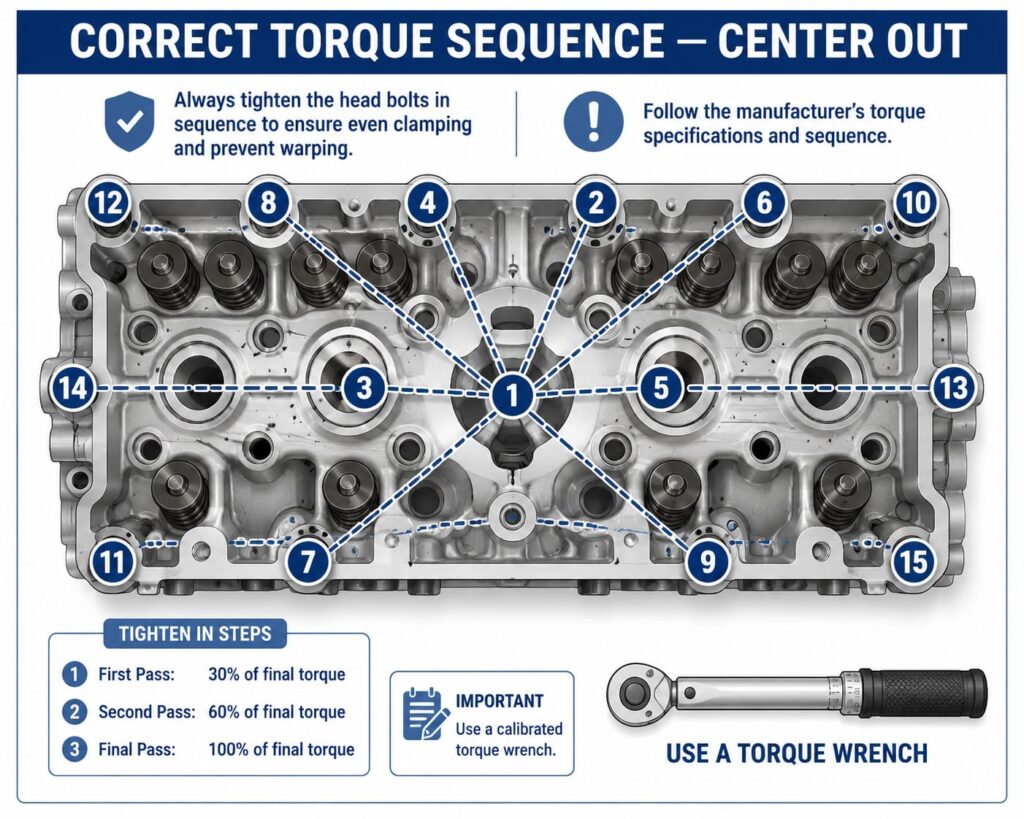
This is the step where precision matters most. Head bolts must be tightened in a specific pattern — typically starting from the center and working outward in a spiral or star pattern — and to a precise torque value, often in multiple stages (for example, a lower initial torque followed by a final pass, sometimes combined with an additional degree-of-turn specification rather than a simple torque number). Skipping stages, using the wrong sequence, or guessing at torque values is one of the most common causes of an early repeat gasket failure.
Step 5: Reassemble Surrounding Components
With the head torqued down, reinstall the components removed during teardown — intake and exhaust manifolds, timing components, valve covers, and any sensors or wiring that were disconnected. Take this step methodically, since a rushed reassembly is where small but important parts (clips, gaskets, seals) most often get forgotten.
Step 6: Refill Fluids and Test Run
Refill coolant and oil, and take care to properly bleed air from the cooling system — trapped air pockets are a common cause of a false overheating reading or a repeat failure shortly after installation. Start the engine and let it run through a full warm-up cycle, watching closely for leaks, unusual noises, or a rising temperature gauge before considering the job complete.
Following each step in order, without skipping the inspection or torque sequence steps, is what separates a repair that lasts from one that comes back within months.
Common Mistakes to Avoid
- Reusing torque-to-yield bolts that the manufacturer specifies as one-time-use only
- Skipping the straightedge check on the cylinder head before installation
- Tightening bolts in the wrong order or to the wrong torque value
- Forgetting to properly bleed the cooling system, leading to trapped air and a false overheating scare
- Rushing the job to save time, which is how most repeat failures happen
Frequently Asked Questions
Can I reuse my old head bolts?
Only if your manufacturer doesn’t specify torque-to-yield bolts. Many modern engines require new bolts every time the head is removed, since these bolts stretch permanently during the torquing process and lose their clamping accuracy if reused.
What happens if I install the gasket backwards?
This can block critical coolant or oil passages, potentially causing immediate and serious engine damage. Always confirm gasket orientation against the manufacturer’s diagram before installation.
Do I need a torque wrench, or can I just tighten by feel?
A torque wrench is essential for this job. Under-tightening risks a leak; over-tightening can crack the head or strip threads. Precision here is not optional.
[LINK: Cylinder Head Resurfacing Stone -> Related Post]
[LINK: Head Replacement Cost -> Related Post]